Sunday, December 30, 2012

M is for MOZZARELLA! Fresh, home made, delectable, creamy, easy,mozzarella.

It's time to make cheese. Pure, clean flavor of homemade mozzarella is a revelation, as is the cheese’s tender, almost flaky, pull-apart texture. Time, patience, detail and cleanliness are the keys.
Creamy, soft, and hand made. You can't buy better

The Recipe:
1 gallon whole milk...it's OK to replace a cup of milk with a cup of cream. Yummy! Just make sure you don't get Hyper- homogenized cream. Same with the milk. It will cause problems with curd formation.
1 1/8 teaspoon citric acid divided. 1/2 is dissolved in water and the other one is sprinkled directly into the milk. (The citric acid is what gives the cheese it's stretch
1/4 tablet rennet, crushed (where do you get this? Try a health food store. Online is easy)
1/4 cup warm water

EQUIPMENT: cheesecloth; kitchen string
Heat milk and citric acid to 88°F in a 7- to 8-qt heavy pot over low heat, stirring occasionally, then maintain a temperature of 88 to 91°F on an instant-read thermometer, returning to and removing from heat as necessary, for 1 hour. (Mixture will begin to curdle.)

Dissolve rennet in warm water, then stir into milk mixture. Let stand, uncovered, maintaining 88 to 91°F, until the consistency of soft pudding, 15 to 20 minutes.

Using a long knife, make cuts across stiffened milk mixture at 1/2-inch intervals, reaching down to bottom of pot, then make similar cuts in stiffened milk mixture to form a crosshatch pattern (small squares) on top. Let stand, undisturbed, 5 minutes. Keeping temperature between 88 and 91°F (reheat when necessary over very low heat), gently stir curds every 10 minutes for 30 minutes, then let curds stand, uncovered and undisturbed, maintaining temperature, 30 minutes more.

Line a large sieve with cheesecloth and set over a bowl. Using a ladle or slotted spoon, transfer curds to center of cheesecloth. Don't just dump the curds into the sieve. Pull sides up over curds to form a sack and tie sides together with a long piece of string as close to curds as possible but without squeezing curds. Suspend sack from a knob or cupboard handle, using string, at least 4 inches from bottom of bowl (sack should not sit in any whey that accumulates; if necessary, discard whey as it accumulates). Let hang 3 hours at room temperature.

Heat a large pot of heavily salted water (1/3 cup salt for 5 qt water) to 170°F. Place one fourth of the curds in a shallow bowl, then ladle about 6 cups hot water over curds and let stand until curds start to meld together, about 2 minutes. Gather curds together with a slotted spoon and remove from water. Working over the bowl of hot water, gently fold the mass of curds over itself in your hands, stretching as you fold. Reheat in hot water as necessary (3 to 5 times) to maintain temperature, folding and stretching until curds become a smooth and elastic disk. I wear a pair of food service gloves for this step. The water is pretty hot.

Form into a ball by tucking outside into center, then pinch edges together. Place mozzarella in cool water to cool completely before eating. Make the rest of the cheese the same way, reusing hot salted water for subsequent batches.
NOTES:
Curds can be made and drained in cheesecloth (3 hours) 1 day ahead, then chilled in a sealable bag.
Mozzarella is best the day it is made but can be kept, covered with water, in refrigerator up to 5 days. Bring to room temperature before serving. Just a side note...cheese is ALWAYS BETTER AT ROOM TEMP.

Don't throw the whey out! Use it to make bread. It really WILL be awesome bread.

The New England Cheesemaking Supply Company has a starter kit. Which I bought and love. You only need to buy the kit once. It’s great and makes more +/- 40 pounds of cheese, and you get everything in the kit but your milk. The kit tells you all the different kinds of milk you can use. The kit is called: 30 Minute Mozzarella & Ricotta Kit.

ENJOY!

Sunday, December 23, 2012

Sous Vide......my new toy..I mean tool

Sous vide = cooking in a warm/hot water bath. Thomas Keller does a LOT of it. And that most perfect steak you had in the very expensive restaurant was probably cooked sous vide and then seared to order at the last second. The original sous vide instrument was in a lab. Not a cooking lab, a chemistry and biology lab. I've used them myself. The way you COOK with it is to vacuum seal the food with all kinds of spices/oil/flavors and then drop the bag into the hot water bath. Then let it sit...sometimes 30-40 min and sometimes hours.

I've jury rigged this technique using a pan on the stove, a slow cooker, and a wok with the food sealed in a zip-lock bag. Not bad but not the best. I've yearned for one of the REAL sous vide "water ovens".


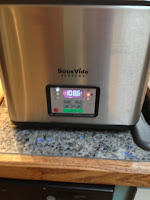
The new Sous Vide Supreme
Wait, wait....while surfing one day I see there is now a less-than-$1000.00 home model. OMG.....how much!? $429.00 with free shipping and no tax (which added up to about $100). Sous Vide Supreme http://www.sousvidesupreme.com/default.aspx  Using a rescent bonus...I went ahead and ordered it. Actually I held my breath...and clicked "add to cart". And then got our my credit card.

the inside, lots of room
close up of the control panel
the chicken breasts, stuffed and ready to go


It arrived about 5 days later. I un-boxed it, read the directions, filled it with water and plugged it in. I took 2 chicken breasts out of the freezer and defrosted them.

The chicken breasts, cooked, browned, with mozzarella
Split the breast, stuffed them with garlic, bacon, salt, and pepper and then added a dollop of butter into the vacuum bag and sealed it.

After cooking sous vide for 2 hours (I took a nap), Wayne got home hungry as usual "becuase he forgot to eat lunch"....really?* sigh, never been a problem I've had.

So made a pot of rice, added a green salad. I then took the breasts out of the water oven....their term...not mine. I like my meat seared so I heated my cast iron skillet hot with vegetable oil and browned them. After turning to the second side it added a slice of my own mozzarella and watched it melt. Split some small tomatoes, added them to the pan then plated everything.

Wayne usually does NOT finish his dinner. He saves what's left for lunch tomorrow. He ate the whole breast! Guess he WAS pretty hungry.

The first sous vide meal was a roaring success. Get ready for MORE sous vide postings.

Tuesday, December 18, 2012

Pulled Pork......pre-delicious

A wise Hawaiian cook has said that "the Pig is the only animal that comes pre-delicious"
What's THAT mean?
What it means is that pork needs NOTHING to make it perfect. It has everything it needs to taste wonderful. Anything we add.....is just additive. Either through the cooking method or spices, it's just additive.
Given that....I bought a 2# pork shoulder butt roast, rubbed it with red Hawaiian salt and liquid smoke. Then wrapped it in banana leaves and put it in the crock pot before we left for work. BANANA????? Yes, apparently it gives the meat a "grassy taste" reminiscent of luau pork baked in a ground oven. Picked up frozen banana leaves at an Asian market. (Wow....banana leaves are BIG!)
How did it turn out?
OMG......the whole house smelled delicious! Pulled out the pork and unwrapped it. Sooo nice! Tender, flavorful, and not much fat left on the meat. I "pulled" the pork apart with two forks and poured off the juices letting the fat to separate. Poured this off and then added the leftover juices to the meat. Final weight of meat....1.3#. About 60% left over.

Added sides were rice, green salad (with pickled onions), and a finely cut coleslaw with vinegar/soy/sesame oil dressing. I also made a sauted onion smokey BBQ sauce. Ahhhhh.
We barely put a dent in this meat for the first meal. Leftovers for the next day.

Stir fry with Vegies for day 3, home made pasta and the pork for day 4, and finally.....BBQ pork pizza to polish it off. Wayne took leftovers to work every day. We got a lot of mileage from 2# of pork! The original roast cost $6 or so.
I forgot to take pictures until the last day with the pizza. DOH!

Sunday, November 18, 2012

French Bread Baguettes at Home

The tale of French Baguettes goes like this....

I got home last night around 11:00. I was scheduled to get home earlier but there was mechanical problems and we had to turn around and change planes. Ahhhh the joys of traveling.

Since I'd planned to make some fresh bread to take along to Joe and Sarah's today...I didn't want to NOT MAKE THE BREAD. THAT would be a real tragedy!
The good news....this recipe starts the night before! You can DO IT!

The night before: dissolve 1 tablespoon or so of yeast in warm water. Add a bit of sugar. The yeast needs a bit of food to get started.
Once the yeast wakes up, add about a cup or more of warm water (I always use more...I like making a lot of bread. We use it throughout the week) a table spoon of olive oil, a teaspoon of salt, and a cup of flour. Mix well, cover, set aside to let the magic of yeast happen. This is called a sponge. About an hour. I got in the hot tub to ease the stress of travel out of my body. A glass or two of wine helped.

After drying off....
Add enough flour to make a raggy dough. WHAT?..... You ask? Just a wet dough. How much flour? Depends on how much water you used. This is bread....enjoy yourself! No kneading yet. Leave it in the bowl. Cover it again. Let it rest and again let yeasty magic happen. About 30-60 min depending on how warm your kitchen is. I have a proofing setting on my oven and used that. 30 min. Was enough.
Last step tonight....stick this bowl of dough in the refrigerator and GO TO BED.

Next morning while you're making coffee. Take the bowl of dough out of the refrigerator and take the four edges of the dough, pull it up and fold into the center, punching it down. Turn the dough out onto a floured board and flour it just enough so that its not sticky. Knead, just a bit. Remember...this is EASY bread.

Cut lengths of dough into long bits, about 2 inches in diameter. Turn this into itself pinching the edge along the length. Roll it and then place in on a bread cloth. WHAT? You don't have a special linen bread cloth? OK, MAKE ONE! If you have a linen dish cloth use that. If not.... A nice flour sack-type towel will work just fine.

A WORD ABOUT BREAD CLOTHS....
Take your towel and work flour into it trying to get the flour worked between the weave of the towel. Work more flour into it and then spread it out. Sprinkle more flour onto the towel. NEVER EVER WASH THIS BREAD TOWEL EVER AGAIN. This is your bread towel for crying out loud! After using it.....take it outside and shake it. If its damp from your bread simply hang it to dry and then fold it and put it away until you use it to bake bread again. Next time...work more flour into it before placing your bread on it. Every time after your bread towel just gets better. Your dough will NOT stick and you will be able to make the most beautiful Baguettes. PRICELESS. The first time you use it...prepare for sticking. Don't worry, gently pull your dough away. The dough might deflate a bit. Not a problem....it will still taste great.
My bread towel is linen...linen is the best. If you can, get one and use it. They're available from any good cooking store but Amazon has them to order online. But most people don't have linen towels laying around. Cotton will work for now.

Back to the bread.....
Take this long roll of dough and place it on your floured bread cloth. Make the next roll of dough. Pinch the cloth up to make a ridge of cloth between the two rolls of dough. Do this for each roll of dough until your out of dough. (See pic) Now, cover your nice little nestled rolls and let the magic of yeast happen. Let them rise in a warm place until doubled.

These are my baguettes in my linen bread cloth

Now is a good time to make breakfast. While you're making and eating breakfast...the yeast in your bread is hard at work making your dough rise
Ahhhhh, the bread ready for baking

Now....for the baking.
If you have a wood fired oven....you are lucky! If not...make one next summer. I did and LOVE IT! See previous posts for info.

If you have a regular oven you can imitate a brick oven by buying and placing tiles on your oven rack. YES.... straight from Lowes or Home Depot....no need for special anything. I use them and they work great!

If you don't have tile laying around...a baking sheet will work just fine....but really...next time you go to your favorite hardware store buy about 8 4x4 inch terracotta tiles. They'll cost less than $10 and are a LOT cheaper than buying a stone baking sheet.

Preheat your oven to 425 deg. Yeah...hot! Once it's ready. Gently turn your beautiful dough onto a baking sheet, sift some flour on top and slash your unbanked baguettes (see pic) Why? This gives the bread room to rise FAST. PLUS it gives them that distinctive French bread look! They're baguettes, remember!
At this stage you can brush them with cream or an egg mix and sprinkle shaved salt, poppy seeds, or sesame seeds. Depending on your taste. I'm doing two naked and two with shaved sea salt.
Depending on how big they are you can put all in at the same time or stage them. If you have the tile, you can put them right on the tile...no baking sheet needed. Put your bread in the oven and spray the oven with water. It creates instant steam. Why? This allows the bread to rise VERY FAST and makes a beautiful crust. After about 5 min. Open the oven STAND BACK....THE STEAM WILL BURN YOUR FACE and spray it again. If you don't have a sprayer (this time) take about 1/8 cup of water and fling it into your oven. Quickly close the door! Let it bake until nice and golden brown. About 20 min but it depends on the size of your loaves.

Take them out and let them cool before slicing and eating. This is the hardest part....seriously. Wait as long as you can. Slice on an angle.....and eat. Butter, jam, honey.....who cares its all good!
Watch the faces of your family and friends when they eat it.....PRICELESS.

Finished baguettes - these are the two loaves with shaved salt


Friday, November 02, 2012

MASCAPONE and bread

I had to stay home yesterday. A bit of food poisoning....yuk. I won't say where I had lunch but in just under two hours....all hell broke loose. Literally. If you've ever watched a horror movie you get the idea. By yesterday morning I was better but very tired. Sleep, only sleep helps and home food. I vow to only eat my own food.... Ever again.
By the afternoon I was feeling a whole bunch better and cleaned out my refrigerator. Hmmmmm, the 1/2 gallon of milk was close to out dating and we were out of bread. What to dooo, what to doooo?
Make CHEESE AND BREAD! For those of you concerned that I shouldn't have been handling food.... I was all over the food poisoning , diligently washed my hands and everything else....and not infectious. FORWARD!
For mascapone:
1/2 gal whole milk
1 C cream (not really necessary but SO GOOD)
1/8 or so cup of lemon juice
1/4 C buttermilk (I used what was left in the carton)
Put the milk products in a large pot over medium heat. Heat the milk until it steams and there is a ring of bubbles around the edge of the pot. Do not boil. Turn off the heat and stir in the lemon juice. Not every lemon has the same amount of acid. If after 30 min the curds don't appear add some more.
The milk will separate into curds (the milk solids) and whey (the liquid part). Cheese is made from the curds.
Line a wire colander with two layers of cheese cloth. Don't have cheese cloth? Use two layers of strong paper towels. Not as good... But use what you have, right?
Scoop the curds into the colander and at the end gently pour everything left into the colander. Make sure the curds are elevated above the whey while draining.
Now the hard part....waiting. I started mine around 5pm. By 11pm I was able to change out the cheese cloth to a layer of paper towels. This allowed me to dry the curds even faster as the towels soaked up more whey. I let this sit on the counter over night.
This morning....mmmmm, mascapone! (See pic). The buttermilk gives it a nice tangy flavor, perfect for a tiramisu.
Another way to make this.... Use home made yogurt, put THAT in a colander and by morning.... Cheese! So easy.

Sunday, October 07, 2012

Made it to Rome... But then we got lost. :-)

Rome is such an amazing city it's hard to explain. We've been here only 10 hours but already I can see that 7 days will not be long enough. We walked around tonight for 5 hours after eating a late lunch/early dinner. We found the Plazza del Fiore which was THE race course for Rome... Think Ben Hur here. Then we continued to the Pantheon. It's hard to believe that people without a real crane or any current machines could accomplish such an amazing architectural feat. It is HUGE and the design copied for the Duomo in Florence, the capital in Wash D.C., and many many more domes across the world. We just stood in amazement in the dark. The connections to today are clear!
On the way back to the apartment we got lost.... Again! But eventually found our way home with help from the Carbinieri and shop owners. Ahhhhh, a bottle of local red wine, bread, cheese bought in the local market around the corner along with eggs, yogurt, and tomorrow the big outdoor market in Campo de Fiore.

Wednesday, October 03, 2012

Latest Stop: Firenze! That's Florence for most in America

Flew in from Munich/Bavaria and family via AirBerlin yesterday. Got I about 3:45 took a cab from the airport. Very nice cabbie, 20E +1 for our bags. Good thing we did, would NOT have found the Il Bargello B&B on our own.
My MINI would feel right at home! But I'd have to thin the paint down as the streets are soooo narrow you need thin paint to negotiate!
The place we're staying is 4 flights up....NO elevator. Just fine but its a workout! The building is from the 1400's!
Walked around to get out bearings and scout out a perfect place for dinner. Found a little grocery for snacks and wine for the terrace later.
There is a little pizzeria JUST ARIUND THE CORNER (Leo's) - WOOD FIRED so its awesome! Talked to the guy running the oven about my oven. How cool!
We climbed the VERY narrow steps to the roof terrace, opened the bottle of prosecco and did our homework for today that will begin shortly with buying our Firenza Card which will give us 72 hour access to 50 museums and all the public transportation our hearts can handle.
First one will be the Accadimea which houses David and a few other oddly assorted artworks :-)! Then on to the Duomo which if it all works out...we will climb to the top for awesome pictures.

Monday, October 01, 2012

Kuchlbauer Tower and a brewery tour

See the pics? This is probably the most beautiful brewery in the world. Hundertwasser was probably the first "back to nature" architect/artist beginning in the 50's. He HATED straight lines thinking them an affront to nature and natural man. He faced all his buildings with colored plaster and tile telling a story in the process. I will be taking some of this direction when it comes time to tile and decorate the wood oven this fall/winter/spring.
And, yes.... They make and pour some awesome beer there too!

Saturday, September 29, 2012

Our Autobahn experience and a day in Salzburg

We are on vacation, a long one. Right now we are in Bavaria visiting family. What an experience! Family I haven't seen in 45 years and other family I've never met.
Yesterday we went to Salzburg, Austria. We drove on the autobahn. I was watching the speedometer (I was NOT driving) at the steady speed of 140 Km. The English conversion for this is around 89mph. Normal.
The autobahn is soooo smoooooth, and fast! About that time a red Ferrari BLEW by us. Now this car looks fast just sitting in a driveway.... Believe me.... On an autobahn it looks a LOT faster! It was probably going 200 Km which is around 124mph.
My question... WHY would anyone in America, with our 70mph max speed want a Ferrari? They belong on an autobahn where they can live free and really be driven the way they are supposed to. Once you experience the speeds here, keeping a Ferrari in America is like caging a tiger.
We are having a great time! Yesterday Salzburg with 7 churches one dating back to 1244, A walk through the catacombs, walking through Salzburg's BEST shopping street (no cars allowed) . The hilltop fortress (which we walked UP to see- there is a fanicular but we poo-pooed THAT) and for dinner.... wurst mit brot and weiss wein. Today... Walking tour of Landshut with family!
What an experience!

Monday, September 24, 2012

I am trashing my gas grill!

I was sooo stinking tired of my gas grill! Friday night I bought two beautiful rib steaks. I made a wonderful rub and while I made salad, potato and grilled asparagus I prepped the steak. I put them on the grill (low-indirect heat) set the table on the deck for a very nice dinner. When I got back to the girl ther was a total flame out, both steaks fully engulfed. Crap! I have HAD IT! While there ARE reasons to have a gas grill, good food is NOT one of them.
While at the fair on the last day last night there was a vendor selling Traeger grills. I admit.... I have looked at them for many years. THIS was a golden opportunity. He made me a screaming deal and I loaded the Junior into the MINI and brought it home. It is in my breezeway waiting for me to put it together. It smokes AND BBQ's!
I CAN NOT wait to get started!

Sunday, September 23, 2012

Last day of WORKING at the Puyallup Fair

I JUST worked 13+ hours at the Fair. I had a great time but am VERY tired. No one was scheduled to do demo this morning and by chance I brought my demo kit.
My demo kit contains LOADS of pearls of many many types and all the silk I should want to do pearl knitting demos. I started doing my surprise demo at 10am and finished at 5pm. That's 7 HOURS of demo. I finished 3 necklaces, 6 bracelet strands, 6 pairs of earrings and tagged and bagged them all. I talked and shared with a load of people (probably >1000)! It was GREAT! Then I worked in the jewelry counters from 5pm till 11pm.
I LOVE watching people but man.....tired.
Tomorrow..... Going to do one last demo in the Hobby Hall from 7pm till 9pm. Come out for the last day one last chance and say HI.

Thursday, September 13, 2012

The Puyallup Fair and working

The BIG Puyallup Fair started last Friday. I have some of my jewelry for sale at the very cool Artist In Action store. It's been loads of FUN but is very tiring. If all I had to do was this (which I totally love) it would be great. I also have a job that's REALLY demanding doing Infection Prevention for a large healthcare system. ALSO VERY cool! Hey, anytime you can have a positive impact on healthcare....its A VERY GOOD THING!
Both wonderful.....but together...... I'm tired. NOT as tired as Grad School :-). Last night I worked at the fair until 10pm. Then I had to make a meeting at 7 am today. Tonight....NOTHING! I went to Tacoma Boys (yaaaayyy TB!). ...got some wonderful Ahi Tuna and made poor, neglected Wayne a great dinner of shished tuna, onion, pepper and tomato with grilled radicchio salad, rice and grilled corn. Ahhhhh, nice dinner, both work sites are good!
Jewelry is selling well...good news with infections, good dinner and wine. It's all good!
Ahhhh, TGIF in about 1 hour.

For those who care..... I'll be doing demos of pearl knotting and just fun jewelry design at Artist In Action this Saturday from 1-6pm and then in the Hobby Hall from 7-9pm. Come by and say HI!

Monday, September 10, 2012

Artist In Action at the Puyallup Fair

I was accepted into the Artist In Action (AIA) Store at the Puyallup Fair this year. I'm selling some of my jewelry most of which is hand knotted freshwater pearls and unique things like fossils, semi-precious stones, amber and other very cool items on a strand. I was in AIA as a fiber artist selling hand spun yarns and hand woven items about 20 years ago. This feels almost like a home coming.

I love sharing what I do. Tomorrow I'll be demo-ing at the Hobby Hall from 4:30-6:30. Pearl stringing and knotting is the order of the day. Stop by and say HI! I'll be working on the set I'll be wearing at the NEXT family wedding next year.

Saturday, September 01, 2012

ahhhh, the FUN side of yeast

I am so amazed at the power of yeast. The fun side of yeast, actually. The NOT SO FUN side of yeast is what I deal with at work...meaning infections. NOT SO FUN.

Yesterday I made 3 beautiful loaves of whole wheat sourdough bread and 25 pizzas for our Quality Department Gathering yesterday. We, of COURSE used the wood fired clay oven. It worked beautifully and was a lot of fun.

The bread and pizza dough began a full week earlier. Here's the story:

Many years ago I started making bread....BEFORE the OVEN (BO). I used the yeast I bought at the store and all purpose flour. It was pretty good....hey....ANY bread made at home is better than almost anything you can get at a grocery store - at least then. NOW....people are asking for better bread and stores are responding with better bread. Excellent crust with good crumb and it even tastes good. STILL not as good as home baked.

THEN...not so much - 20 years ago. So, I started making bread when I had the time (at the time I worked part-time). With 3 boys and a husband you can imagine how long it took to disappear. It was pretty good! There were a few times when I ran out of time and didn't get around to actually baking the bread. The dough took on a life of it's own.....while I wasn't looking. It started smelling soooo good....sour.....like sourdough. Now I KNEW about sourdough but hadn't made any. Golden opportunity! Knocking the dough down, reformed the loaf and baked. WONDERFUL! So, research into sourdough told me (at that time....a trip to the library) that I needed a save some dough and keep it for a starter for next time. RATS....baked all of it. Further research said to try again. HEY, the miners and loggers in the west had been doing this for years without going to Safeway....I could too. So, tried it again.....old dough BUT it tasted different. WHY.....a different strain of course! This one was better in fact. OK, I saved some and kept it in the refrigerator. I re-used the started the next time and always saved some in a glass jar in the refrigerator - for next time. Awesome. Sometimes it would die.....sad. NO Problem.....make a new one. Yeast is cheap! AND.....turns out my kitchen has it's own strain......for bread. I leave a mix of water and flour with some sugar open in a bowl and it automatically grows a strain of yeast that is perfect for bread. You might say my kitchen is COLONIZED with the perfect sourdough yeast.

See......yeast....the fun, yummy side.

The sourdough bubbling away
The loaves resting and rising in the bakers cloth
Today....I'm starting an other batch of dough to bake some bread for our yearly family gathering tomorrow. Took some of my trusty starter out of the crock I just bought from King Arthur Flour (the best flour - bar none). It's solid with red accents and has an honored spot in the back corner of the refrigerator. Mixed up a "Biga" of the starter with warm water, flour and sugar. Let that sit in my warm kitchen overnight.....oooooooh, magic happens! It's nice an bubbly! Added some more warm water, more flour, a bit of honey....olive oil and salt......mixed it up.....covered it again to grow/rise. More magic....Now it fills the bowel! I'll punch it down, take it out and mix in more flour to turn it into a nice soft cushy ball. Turn it into a well oiled bowl and refrigerate it overnight (tonight). In the morning, I'll divide it up into loaves - 3 or more...depending. Let them warm and rise in my linen bread cloth. About 3 pm I'll fire up the oven again. When it's about 500 degrees F the loaves will go in and I'll spray some water into the oven. This will INSTANTLY turn to steam. (It's important I don't have my face near the door - super HOT steam) and close the oven door. After 10 min I'll peek and maybe turn the loaves for even baking. Close the door again and wait about 20 more min. Check the loaves by tapping. They should be nice and toasty brown and when tapped....sound hollow. Take them out....let them cool (about 30-40 min). Then they're ready to slice to use with my goat cheese, fig and balsamic jam, and honey........ahhhhhh.

Are you drooling yet?

More PICS to follow!

Sunday, August 26, 2012

Stacking up a good supply of fruit/alder wood

We spent most of the weekend working with wood. Storage, cutting, stacking.
Last winter we had a week-long ice storm. Sadly, we lost many trees. Our plum trees were total losses. We cut them down the rest of the way and didn't have time for much more, just piling in a mound in a corner of a field.
This weekend we finished the job. Wayne built a very nice wood storage box and we set it up near the wood fired oven so I don't have to walk or carry so far for wood. Sooo nice!
We cut all the wood into smaller pieces and carried and stacked it in the new wood shed.
Friday the whole Quality Department at work will be here for our summer gathering. We'll be making a LOT of pizzas in the wood oven.

Then....the next Sunday we're having our annual Harris Gathering and golf party. Extended family and all our new family and future family will be here. I still haven't decided what to cook, probably not pizza. Maybe a nice roast. I WILL be making bread.
The nicely stacked wood will certainly come in handy!

Saturday, August 11, 2012

Neighbors Night Out: BIG gathering

Last Tuesday we had about 30 people at the house for Neighbor's Night Out. This is a way for neighbors to get together to know each other and come up with a plan during a disaster and hopefully to stop break ins.

We had a great time. I started making pizza dough on Friday (sourdough) and made some scratch red sauce (2 types-spicy and not). People brought toppings. We had SOOOOO MUCH FOOD!

I started the oven about 4:30 and had it nice and hot (about 700 deg) by 5:30 when I put the bread in to bake so we could have fresh bread for munching before dinner was ready. Mmmmmm

I'd already flattened the dough into rounds to make stretching easier. I was aiming for 10in pizza. I showed everyone how to stretch the dough on cornmeal, they topped with what they wanted and then I used the pizza peel to slide it onto the hot oven floor.

This was the FIRST TIME I did this for soooo many people. One lesson learned: Make at least 2 pizza making stations.

Here are a few pics: (taken by our neighbor Rick - I was too busy cooking! THANKS Rick!)
Too much fun

Our Neighbor Trip telling people about NNO
We had soo much food left over! Wayne helped me put it all away but the refrigerator is FULL!
Andy and Tammy are driving down tonight to watch the meteor shower. We have DARK skies and it promises to be spectacular.
The menu: PIZZA! This time not in the oven, but on the grill. Not as much fun but then not as hot.

Sunday, July 29, 2012

Full Day of Wood Oven Cooking

Started the oven up at 3pm and eventually got it as high as 965F! That's HOT folks! I think the cherry wood was nice and dry since I put it in the oven at the last burn when it was still warm. Started hot and just got hotter. In fact too hot to bake the chickens I planned. Put the first (beer can) chicken and flattened chickens in at around 700 deg. Pushed all the fire/coals to the back of the stove. It was still too hot but we had time constraints.... So in they went with foil tenting.
2 full chickens, cooked and cut into juicy pieces
LOTS OF SIZZLE RIGHT AWAY! Went in at 4:15pm. Turned them every 15 min. Still got pretty "crusty" but sure smelled good. By 5pm both hit internal temps of 140 deg. At 5pm put in 5 soaked ears of corn. They got hot fast and by 5:15 they were ready....too ready. Even though I turned them the sides toward the fire burned.
Smokey, caramelized corn
Hmmmm what to do? Cut the good side off into a bowl and add butter. Mmmm, perfect! Nice and smokey flavor, caramelized sugars with butter!
Add a green salad.
I cut the chicken up to a platter, opened a bottle of white wine and we sat down to eat.
Dessert: S'mores! Took SECONDS for the marshmallows! Oven still around 500 deg.
Marshmallow perfect
Holy Cow! What can I do with all this heat???
Cook more!
Roasted garlic bulb perfection
Left over swordfish steak... Just waiting in the refrigerator, more garlic bulbs, added vegetables to the chicken giblets and onions to roast for stock, left over dough from last weekend for flat bread, and finally... As those temps hit 400 deg....made some buttermilk biscuits. Seriously.... At 9pm. (at Wayne's request)
Giblets and vegis roasting
Residual cooking temp!
Now... Finally... Done for the day. It's 10 pm. Oven is still warm and the coals are dying down. The plan: put in not-quite-dry- wood to dry for a great fire next time.

Smore assembly

Now, Sunday morning: checked the oven. It's STILL warm. AMAZING! oven is full of VERY dry wood just waiting for the next burn.

Finished Smore
Biscuits!

Friday, July 27, 2012

Pasta with grilled swordfish and corn sauce

Whoa... It's been a while since I made some scratch pasta. I had some basil that need to be used...... Flour.. Check. Egg.... Check. Basil.... Check. Salt and pepper... Check. Food processor....CHECK! LET'S GO! (see pics and earlier posts on how to do it)
Swordfish in the freezer, one piece of corn, peas from the garden. Don't forget the cream and white wine. Swordfish grilled, pasta rolled cut and cooked. Sauce cooked....Pasta dressed and then played.
Time to EAT!

(Even enough for lunch tomorrow. PLUS enough ready-to-cook pasta just waiting for the next meal.)

Why wouldn't you make your own pasta?

marinating swordfish
ahhhh, the pasta...waiting to be cooked
perfect grill marks on the fish, pasta, more colorful than the pic,
very tasty too!

Tuesday, July 17, 2012

Popsicles!

My Zoku Popsicle maker arrived Friday. It was on the porch when I got home. Hmmmmm, what can I make? Last night i used it! I put it in the freezer Friday night I had 1/2 a small watermelon and a mango in the refrigerator. PERFECT!
Cut both into bits, put in my food processor. Added juice of one lemon, and couple tablespoons of cane syrup. (this keeps ice crystals from forming. I use it in sorbet too).
It turned into a very fragrant slurry of fruit pulpyness. I then poured this into the three slots for Popsicles and fitted the handles. The first batch of 3 pops took about 5 min. The second took a little more than 10. They popped out nicely and I wrapped them in plastic wrap. We each had one for dessert and there are 4 left!
Yummy! Can't wait to try more.