Sunday, October 30, 2011

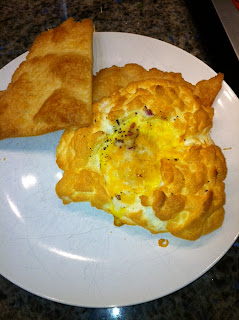
Nid d'oeuf = eggs in a nest = an excellent breakfast, easy, low fat, low carb, easy cleanup. How can you beat that?

Found this in a French cookbook. Can I speak or read French? No, but thanks to Google translate......we all have access to french recipes!
Yummy Nid d'oeuf with crust
Take a look at this! Wonderfully easy, low fat, low carb (well, except for the pastry that you don't HAVE to have).
So, here's the recipe: (serves one - add it up for more, or just use one egg per person)

INGREDIENTS


    2 eggs
    1/4 teaspoon salt
    1/4 cup grated Gruyere cheese
    Sprinkle of cream of tartar....not necessary but I have it on hand. Don't go out and buy it just for this. It helps to stabilize the whipped whites.

      METHOD

      1 Preheat the oven to 450°F with a rack in the middle. Line a roasting pan, or baking sheet that can take high temperatures without warping, with parchment paper or Silpat. You can see I have a Silpat sheet. NOT necessary, use parchment paper and you just toss it...NO clean up!
      2 Separate whites from yolk. Make sure there are no little pieces of egg yolk in the whites or you will have difficulty getting the whites to beat properly. It helps if you are making more than one egg nest to keep each egg yolk in a separate prep bowl. I put them all in the same bowl. 2 of 4 yolk broke. It STILL tasted great.
      3 Place the egg whites in a very clean mixer bowl (any residual oil in the mixer bowl will keep the egg whites from whipping up properly). Add a quarter teaspoon of salt to the egg whites. Beat the egg whites with a whisk attachment in a mixer (or using a hand mixer), starting on low speed and then slowly increasing to high speed, until stiff peaks form. Add the cream of tartar here too. I like to beat egg whites by hand....it's just very satisfying and I like the control.
      I used 4 eggs, 2 each. You can see I broke 2 yolks :-(


      4 Gently fold in the grated Gruyere cheese, taking care not to deflate the egg whites.
      Whites whipped, time to fold in cheese

      egg-nests-5.jpg
      The little "nests"
      5 Create two mounds of the egg white mixture on the lined baking sheet. Form the mounds so they look like nests, with indentations in the centers.
      6 Place in the oven for 3 minutes. After 3 minutes, open the oven, pull out the rack with the egg white nests, and gently add an egg yolk to the center of each nest. Return the baking sheet to the oven and cook for 3 more minutes.
      Nests baking - looks like it's working!


      Initial bake done. Add the egg yolks.

      7 While I was mixing the egg whites and while the oven was warming up I had some left over pastry crust from earlier. I thought.....WHY NOT use this? (I hate to throw out perfectly good pastry dough). Took it out and off the Silpat before making the nests. Added YUM!
      NEVER waste pastry dough!

      Serve immediately.
      And now (again) the finished product: You can see I added some grated cheddar, diced red onion, and ground pepper before putting it back in the oven for the final finishing baking. I have a convection oven, but not necessary....!
      Again, the finished product!
      I can NOT eat eggs without Tabasco sauce. Next time I make it, I'll put a few drops on top before the final bake.

      Tuesday, October 25, 2011

      home-made tortillas.....the best! You'll never buy them again.

      After a long day of work today, we got home and needed to make dinner. In the refrigerator....pork, peppers, onion, tomatoes. Rice in the pantry along with spices.
      What to make?
      Chili Colorado....but I need tortillas! I have AP flour, crisco, salt, baking powder....everything I need.
      The recipe:
      2.5 c. AP flour
      2 tsp baking powder
      1 tsp salt
      1/2 c crisco (I like the butter flavor)
      1 c hot water (yes, hot!)


      Mix all the dry ingredients in a bowl.
      Cut in the crisco with a pastry cutter until well mixed. Add the cup of hot water. Mix together, knead. Form into a ball and wrap with plastic wrap for at least 30 min.


      Cut the large ball into a dozen or so small balls - ping pong ball size. Roll out, not too thin. Use a cast iron pan.....no you don't REALLY need one but I love mine and it's perfect for this. Turn the heat to just between medium and high. Use just a bit of crisco in the pan. Place a tortilla in the pan. Watch it puff up! The first 2 might not be perfect but don't give up. Turn when it feels like the first side is done. It's OK to peek. Turn it over and finish it. Go on to the next ones,
      I keep them warm in the oven...on low until ready for dinner.
      How long did it take? About an hour - start to finish. I have enough for 2-3 more dinners. Yummy!

      Here's a pic as the first side is cooking. See how it puffs?
      Now, this is what it looks like after you turn it.
      Now, put it on a plate in the oven (on warm) until you put it on the table.

      Saturday, October 22, 2011

      chicken pot pies

      Lets try something a little more fun than Listeria.....

      It's turning cold around here which makes me want to bake. I LOVE pot pies. The problem is that the pies you get at the store in the freezer section are really bad and really bad for you! READ the ingredients! I have a great recipe for chicken pot pies. It's a great way to use leftovers, but don't wait until you have leftovers, use 1-2 frozen chicken breasts! Poach them or bake them and use that.
      Here it is:

      For the crust (makes a lot of crust - cut it down for only 2 or make more and freeze them for later):
      2 cups all-purpose flour
      14 tablespoons (1¾ sticks) cold unsalted butter, cut into pieces
      1 tablespoon cold vegetable shortening
      Scant ½ teaspoon salt
      Scant ½ teaspoon sugar
      1 egg 

      For the filling:
      5 tablespoons unsalted butter
      1 cup chopped carrot
      1 cup chopped celery
      1 cup thinly sliced leeks
      1 tablespoon chopped fresh tarragon
      1 cup frozen baby green peas
      4 tablespoons all-purpose flour
      2½ cups chicken broth
      1 cup heavy cream
      Salt and freshly ground pepper
      3 cups leftover roast chicken, cut into ½-inch chunks.
      1. To make the crust, combine flour, butter, shortening, salt and sugar in a food processor. Pulse together just until the mixture is crumbly and butter is broken into small pieces. Pour 1/3 cup ice water into the machine, and pulse 3 or 4 times. Squeeze a little dough in your hand to see whether it clumps together and is evenly moist. If not, add another tablespoon of water, and pulse 1 or 2 times more. Don't over mix so that the dough forms a ball.
      2. Turn out dough on a large sheet of plastic wrap. Lift ends of plastic to gather dough together inside. Press into a large disk, and wrap tightly in plastic wrap. Refrigerate until ready to use, up to 2 days.
      3. To make the filling, melt 2 tablespoons butter in a large skillet over medium-high heat. Add carrot, celery, leeks and tarragon, and cook, stirring, just until slightly softened but not browned (reduce the heat if necessary to prevent browning), about 3 minutes. Transfer cooked vegetables to a bowl, wipe out the skillet, and place it back on the stove.
      4. Add remaining 3 tablespoons butter, and melt over medium heat. Whisk in flour, and cook, whisking, until the mixture bubbles and smells cooked. Do not let it brown. Whisk in 2 cups broth, and cook, whisking, 1 minute. Whisk in cream, and cook 2 or 3 minutes, just until thickened. Season to taste with salt and pepper. If the sauce is too thick, whisk in remaining broth.
      5. Heat the oven to 400 degrees. Add cooked vegetables and peas, chicken and sauce to 8-ounce deep pie dish or other baking dish, mix gently, and taste for seasoning.
      (Note - this is a single crust pie. For a 2 crist pie, line the pie plate with a rolled out crust. Pre-bake the pie in the oven until nearly done. NOW add your filling. Pre-baking keeps the crust from getting too soggy.)
      6. Flour a work surface. Remove dough from refrigerator, and cut in half. (Set aside half for another recipe.) Roll out remaining dough, turning and flouring often, and cut a shape approximately the size of your baking dish plus 1½ inches overlap all around.
      7. Whisk egg in a small bowl. Brush onto rim of dish. Roll dough up onto the rolling pin, and unroll over dish, so it rests evenly on top of filling. Press overlap onto the rim and against the outside of the dish, sealing tightly. Poke tip of knife through crust to create 3 vent holes near the center. Place on cookie sheet, and place in oven.
      8. Bake 20 minutes and then reduce temperature to 375 degrees. Bake 15 to 20 minutes more, until crust is golden and filling is bubbling through vents. Let rest 10 minutes before serving. 
      It's also possible to use individual ramekins for individual pies. These will freeze nicely after you assemble them. Take them out of the freezer and put in the 375 degree oven. Give them about an hour to bake.
      Yield: 8 servings.
       Who needs those nasty pies from the freezer section of the store???? These are MUCH better!

      Wednesday, October 19, 2011

      Listeria outbreak update

      As of October 17, 2011, a total of 123 persons infected with any of the four outbreak-associated strains of Listeria monocytogenes have been reported to CDC from 26 states. 25 deaths have been reported. In addition, one woman pregnant at the time of illness had a miscarriage. All illnesses started on or after July 31, 2011.
       Here is the epi curve from CDC:
      This is an excellent example of a single source epidemiological curve or epidemic curve. There still might be more reports of new positive cases since Listeria continues to grow at refrigeration temperatures. The numbers will dwindle back to the normal background reports, thankfully. The melons are gone out of most home refrigerators. Normally, there are as many as 600 positive reports each year. The thing that made this Listeria outbreak so different was that it originated in produce - melons and that it was so widespread. We usually see it in homemade cheeses and preserved meats.
      There are reports out that claim the outbreak was due to less-than-sanitary-conditions at the processing plant at the farm. They had just bought used processing equipment in June that showed corrosion and was difficult to clean. Plus there were no drains in the floor allowing dirty water to accumulate. Interestingly, the outbreak started in July.
      As it turns out, when the FDA tested EVERYTHING in and around the farm, trucks, processing plants they discovered the fields were clean (well, as clean as fields get) - no Listeria. Where did they find it?
      1. In the puddles on the processing facility plant
      2. In and around the old but newly acquired processing equipment
      3. In the truck that carried the "not fit for human consumption - past their prime" melons that went to and from a farm nearby that had pigs and cows.
      Another thing that contributed to the outbreak was the fact that they did not "flash cool" the melons as they came out of the field. Anyone who knows anything about food knows that you must first cool warm food before you put it in the refrigerator. What happens to the inside of the food? It stays warm.....sometimes for a LONG time! PERFECT for bacterial growth.
      With any luck, this outbreak will soon come to an end and we'll all learn a valuable lesson about food handling. Too bad and sad that so many people got sick and that 25 had died.

      Sunday, October 16, 2011

      Creme fraiche, homemade...VERY EASY!

      How about something REALLY special as a topping for so many things? Let's try some Crème Fraiche and of course.....home made! That's when you know everything is the BEST quality.

      Homemade Crème Fraiche
      Ingredients (for 2 cups)
      • 2 heaped Tbsp cultured buttermilk
      • 2 cup of heavy cream
      Directions
      1. Put the buttermilk and heavy cream in a glass jar (e.g. canning jar) and mix thoroughly.
      2. Find a warm spot in your kitchen (top of oven or fridge) and let the magic happen for about 24 hours.  Your jar should be covered with paper towel or cheesecloth, preferably secured with a rubber band — the mixture needs to breath so we prefer not to close the jar with the lid.
      When it has thickened (it will still not be as thick as it’s supposed to be, refrigeration will finish the process), mix and put the jar with the lid in the fridge overnight for about 12 hours.  Depending on the expiration dates of the buttermilk and heavy cream you used, your homemade creme fraiche can be stored in the fridge for 1 to 2 weeks.

      So....what can you do with this little bit of heaven?


      Try your homemade creme fraiche in main courses: Quiche Lorraine, onion tart and ham, pasta carbonara, scallops in creme fraiche.
      Try your homemade creme fraiche in desserts: on top of apple pie, apple tart tatin, pear confit, sorbet of any kind, or just fresh fresh fruit.

      Use your imagination!

      Friday, October 14, 2011

      The fund raiser and the fresh pasta section

      I brought 5 lbs of pasta. Spinach, basil, pepper, whole wheat, edible flowers, garlic.
      Printed some sauce recipes and directions for cooking.We had a great time the whole day and made a lot for the cause. People are sooooo generous.

      Wednesday, October 12, 2011

      Pesto sauce recipe - using spinach


      This is another sauce recipe. Try it! Leftovers? Freeze it and add it to a lot of different things. Pasta salad, pizza, roast, BBQ marinade.....use your imagination.

      Ingredients

      • 3/4 cup baby spinach leaves
      • 1/4 cup fresh basil leaves
      • 1/4 cup toasted pine nuts
      • 1/4 cup grated Parmesan cheese
      • 2 cloves garlic
      • 1/4 teaspoon salt
      • 1/4 teaspoon freshly ground black pepper
      • 1-1/2 teaspoons fresh lemon juice
      • 1/4 teaspoon lemon zest
      • 1/4 cup extra-virgin olive oil

      Directions

      1. Blend the spinach, basil, pine nuts, Parmesan cheese, garlic, salt, pepper, lemon juice, lemon zest, and 2 tablespoons olive oil in a food processor until nearly smooth, scraping the sides of the bowl with a spatula as necessary. Drizzle the remaining olive oil into the mixture while processing until smooth. 
      2. Add this to your warm pasta and toss. Add more Parmesan as you'd like.
      3. Leftovers are perfect! Freeze into cubes and add to anything that needs extra flavor. 

      Tuesday, October 11, 2011

      As promised....a recipe for basic (from scratch) tomato sauce

      Home made tomato sauce is better than anything from a jar or can!

      Ingredients

      Roma tomatoes and the sauce
      • 1/4 cup olive oil
      • 1 yellow onion, 1/4-inch dice
      • 4 garlic cloves peeled and thinly sliced
      • 3 tablespoons chopped fresh thyme leaves, or 1 tablespoon dried
      • 1/2 medium carrot, finely grated
      • a pound of peeled tomatoes, roma preferred but others are good too. What do you have available? It's all good! (How do you peel a tomato? Answers to follow)
      • No time to peel tomatoes or don't have any? 2 large cans of peeled tomatoes are (almost) as good.
      • Salt 

      Directions

      Peeling tomatoes (via blanching):
      Bring a pot of water to slow boil. Add a 1/2 tsp salt. Drop 2-3 tomatoes at a time into the water. Use a chinese basket or slotted spoon. Use the spoon to put into the water so you don't get splashed. Wait about a minute. Pick up the tomatoes and drop them into ice water. Repeat with more tomatoes. Add ice as the water warms up. When all tomatoes are done, the skin should easily slip off. Piece of cake! Put the skins in your worm bin or compost pile. The little worms love them!
      Peeling tomatoes (via roasting)
      Cut all the tomatoes in half and take out the stem core. Place all the tomatoes sliced side up on a baking sheet. Add some whole cloves of garlic (2-3) salt, pepper and drizzle with olive oil. You can add your carrots now too. They are really good roasted for your sauce. Turn the tomatoes over, skin side up. Roast at 350 degrees for about 45 min. Take out of the oven and let it cool. After cooled, the tomato halves will slip right out of their skins. Again - compost the skins.
      The sauce:
      In a 3-quart saucepan, heat the olive oil over medium heat. Add the onion and garlic, and cook until soft and light golden brown, about 8 to 10 minutes. Add the thyme and carrot, and cook 5 minutes more, until the carrot is quite soft. Add the tomatoes and juice and bring to a boil, stirring often. Lower the heat and simmer for 30 minutes until as thick as hot cereal. Season with salt and serve. This sauce holds 1 week in the refrigerator or up to 6 months in the freezer
      Obviously, if you roasted your tomatoes, carrots and garlic you'd add them all together
      Some things to add: More carrots, peppers, fresh basil, mushrooms, red wine, roast before turning into sauce, use your imagination! Enjoy! It's not rocket science----you're feeding your family! It's all good!

      Sunday, October 09, 2011

      my pasta recipe....very adaptable!

      This makes more than enough for a family of 4. Or...if you're only 2.....2 meals with leftovers!~

      Ingredients

      • 3 1/2 cups unbleached (I use some 00 semolina flour (I order from Amazon since I haven't been able to find a source near me) when I have it.... plus some Tom's Red Mill semolina. http://www.bobsredmill.com/semolina_pasta-flour-mtx1495.html). Makes a very elastic, tasty pasta. Play around with other flour types......I do. I have used whole wheat, high gluten flour and am thinking of adding some almond flour with some lemon zest).....mmmmmm.
      • 1/2 tsp salt
      • Additions....
        • Spinach (I have used frozen, fresh and blanched....it all works)
        • Basil
        • Garlic
        • Tomato paste
        • Sour cream, creame fraishe
        • ?? Combination of some or all. I've just played with edible flowers!
      • 2-3 extra-large eggs (more or less - be flexible)
      • Water - if you need it

      Directions

      I use my Cuisinart food processor. Put all the flour and the salt in the processor. Pulse 1-2 times. While the processor is on, add your additions, spinach, tomato, etc. Keep the processor going.....when all the additions are blended and mixed, add your eggs - one at a time. Give it time. If it looks like a dough.....you're done. If it's still dry....add just a bit of water at a time. Let it mix. If it doesn't mix well....Stop the processor and move the stuck dough to the middle. Keep doing this until it's a dough. Take it out...knead it with a bit of flour and then wrap it in plastic wrap for at least 30 min.
      If you're doing it by hand (Note.....this is a LOT of fun! And good fun to do with kids!)
      Mound the flour in the center of a large wooden cutting board. Make a well in the middle of the flour and salt, add the eggs. Using a fork, beat together the eggs and begin to incorporate the flour starting with the inner rim of the well. As you incorporate the eggs, keep pushing the flour up to retain the well shape (do not worry if it looks messy). The dough will come together in a shaggy mass when about half of the flour is incorporated.

      Start kneading the dough with both hands, primarily using the palms of your hands. Add more flour, in 1/2-cup increments, if the dough is too sticky. Once the dough is a cohesive mass, remove the dough from the board and scrape up any left over dry bits. Lightly flour the board and continue kneading for 3 more minutes. The dough should be elastic and a little sticky. Continue to knead a bit longer, dust the board with flour when necessary. Wrap the dough in plastic wrap and set aside for at least 30 minutes at room temperature. Roll and form as desired.At this time, you can put it in the refrigerator overnight...or when you can get to it.....don't wait too long.
      It's not necessary to have a pasta roller and cutter. (but it's a lot of fun) I have an attachment for my KitchenAid mixer.....NOT necessary! DO NOT LET THIS STOP YOU!
      If you're doing it by hand.....
      1. cut the pasta into smaller pieces enough to fit in your palm.
      2. roll it out on a board with a rolling pin (I have a french pin), use flour and turn as needed to keep from sticking
      3. Roll until it's as thin as you want....I like mine thin but it's a bit harder to handle
      4. a very sharp knife is all you need but if you have a rolling cutter (either pizza cutter or pasta cutter) this is easy. Cut as wide or narrow as you'd like....if making lasagna....noodles = wide...if narrow = linguine. I would not make thin spaghetti unless you have OCD. At least by hand.
      5. Use a VERY sharp long knife and slide it under your pasta on the board. Lift up the pasta using the blunt side. Hang the pasta over something. I have a pasta dryer....see below pics. I have used broom handles between chair backs.
      If you have a pasta roller....roll it out and cut accordingly.
      6. Let pasta dry just 10-15-20 min. But more is OK.
      7. Get your sauce started (I'll have some recipes posted soon). And get a large pot of water to boil
      8. As the water starts to boil, add about a tsp of salt.
      9. Drop your pasta into the boiling water. I use a Chinese basket dipper. Works great. Keep the pasta moving.
      10. While the pasta cooks, get your sauce almost finished. Use a bit (1/2 cup) of pasta water in your sauce. This stuff is MAGIC! Everything it's in tastes and looks better. It will probably cure some disease in the future.
      11. Check your pasta.....note: fresh pasta does NOT take long to cook! When it's 85-90% done, dip it out and add to your sauce. This is called "saucing your pasta, or finishing the pasta". Soooo much better than spooning sauce on the top of pasta. Mix as needed. Deliver to your warmed plates.
      12. Sit and eat! Add a nice green salad.
      13. Enjoy! Heaven is upon you! It might save your marriage.

      I guarantee this will be better than almost anything else you've eaten before!


      Changes to basic pasta:
      I sometimes add sour cream....to the pasta. VERY smooth and creamy.
      Shapes....
      This recipe can be used for ravioli, cavatelli, orchieta, etc. I'll have more to follow.


      pasta making day - LOTS of it!

      I spent the last 6 hours making a BUNCH of home made pasta. A co-worker has just been diagnosed with stomach cancer. Our department is having a fund raiser for him and his family on the 14th. I am making pasta....a LOT of it. I'm dividing into approximately 100gms per bag. Just about right for one person. It's about 80 gms/person for dried pasta...so this is just about right. Wish us luck at the fund raiser.
      So far I have 4 different types
      The spinach pasta - that's my awesome KitchenAid mixer in the back (it's red)
      #1 is my personal favorite: spinach, with a bit of basil.
      #2 is also very very good. Sun dried tomato
      sundried pasta on my pasta drier
      #3 is basil and garlic- it's got some kick: (well - sideways)
      basil and garlic
      #4 is a new one...this is whole wheat, pepper and a blend of edible flowers. Smells wonderful! I'm making a bit for us for dinner tonight. The flowers: Lavender, calendula, nasturtium, rose and cornflower.
      Whole wheat and flowers+pepper. I call it "Flower power"
      Also, for tonight I'm using the tomato sauce from tomatoes from the garden and some sun-dried tomatoes from Andy. Along with some roasted vegetables.
      roasted vegetables
      tomato sauce