Sunday, December 30, 2012

M is for MOZZARELLA! Fresh, home made, delectable, creamy, easy,mozzarella.

It's time to make cheese. Pure, clean flavor of homemade mozzarella is a revelation, as is the cheese’s tender, almost flaky, pull-apart texture. Time, patience, detail and cleanliness are the keys.
Creamy, soft, and hand made. You can't buy better

The Recipe:
1 gallon whole milk...it's OK to replace a cup of milk with a cup of cream. Yummy! Just make sure you don't get Hyper- homogenized cream. Same with the milk. It will cause problems with curd formation.
1 1/8 teaspoon citric acid divided. 1/2 is dissolved in water and the other one is sprinkled directly into the milk. (The citric acid is what gives the cheese it's stretch
1/4 tablet rennet, crushed (where do you get this? Try a health food store. Online is easy)
1/4 cup warm water

EQUIPMENT: cheesecloth; kitchen string
Heat milk and citric acid to 88°F in a 7- to 8-qt heavy pot over low heat, stirring occasionally, then maintain a temperature of 88 to 91°F on an instant-read thermometer, returning to and removing from heat as necessary, for 1 hour. (Mixture will begin to curdle.)

Dissolve rennet in warm water, then stir into milk mixture. Let stand, uncovered, maintaining 88 to 91°F, until the consistency of soft pudding, 15 to 20 minutes.

Using a long knife, make cuts across stiffened milk mixture at 1/2-inch intervals, reaching down to bottom of pot, then make similar cuts in stiffened milk mixture to form a crosshatch pattern (small squares) on top. Let stand, undisturbed, 5 minutes. Keeping temperature between 88 and 91°F (reheat when necessary over very low heat), gently stir curds every 10 minutes for 30 minutes, then let curds stand, uncovered and undisturbed, maintaining temperature, 30 minutes more.

Line a large sieve with cheesecloth and set over a bowl. Using a ladle or slotted spoon, transfer curds to center of cheesecloth. Don't just dump the curds into the sieve. Pull sides up over curds to form a sack and tie sides together with a long piece of string as close to curds as possible but without squeezing curds. Suspend sack from a knob or cupboard handle, using string, at least 4 inches from bottom of bowl (sack should not sit in any whey that accumulates; if necessary, discard whey as it accumulates). Let hang 3 hours at room temperature.

Heat a large pot of heavily salted water (1/3 cup salt for 5 qt water) to 170°F. Place one fourth of the curds in a shallow bowl, then ladle about 6 cups hot water over curds and let stand until curds start to meld together, about 2 minutes. Gather curds together with a slotted spoon and remove from water. Working over the bowl of hot water, gently fold the mass of curds over itself in your hands, stretching as you fold. Reheat in hot water as necessary (3 to 5 times) to maintain temperature, folding and stretching until curds become a smooth and elastic disk. I wear a pair of food service gloves for this step. The water is pretty hot.

Form into a ball by tucking outside into center, then pinch edges together. Place mozzarella in cool water to cool completely before eating. Make the rest of the cheese the same way, reusing hot salted water for subsequent batches.
NOTES:
Curds can be made and drained in cheesecloth (3 hours) 1 day ahead, then chilled in a sealable bag.
Mozzarella is best the day it is made but can be kept, covered with water, in refrigerator up to 5 days. Bring to room temperature before serving. Just a side note...cheese is ALWAYS BETTER AT ROOM TEMP.

Don't throw the whey out! Use it to make bread. It really WILL be awesome bread.

The New England Cheesemaking Supply Company has a starter kit. Which I bought and love. You only need to buy the kit once. It’s great and makes more +/- 40 pounds of cheese, and you get everything in the kit but your milk. The kit tells you all the different kinds of milk you can use. The kit is called: 30 Minute Mozzarella & Ricotta Kit.

ENJOY!

Sunday, December 23, 2012

Sous Vide......my new toy..I mean tool

Sous vide = cooking in a warm/hot water bath. Thomas Keller does a LOT of it. And that most perfect steak you had in the very expensive restaurant was probably cooked sous vide and then seared to order at the last second. The original sous vide instrument was in a lab. Not a cooking lab, a chemistry and biology lab. I've used them myself. The way you COOK with it is to vacuum seal the food with all kinds of spices/oil/flavors and then drop the bag into the hot water bath. Then let it sit...sometimes 30-40 min and sometimes hours.

I've jury rigged this technique using a pan on the stove, a slow cooker, and a wok with the food sealed in a zip-lock bag. Not bad but not the best. I've yearned for one of the REAL sous vide "water ovens".


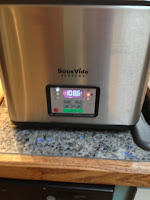
The new Sous Vide Supreme
Wait, wait....while surfing one day I see there is now a less-than-$1000.00 home model. OMG.....how much!? $429.00 with free shipping and no tax (which added up to about $100). Sous Vide Supreme http://www.sousvidesupreme.com/default.aspx  Using a rescent bonus...I went ahead and ordered it. Actually I held my breath...and clicked "add to cart". And then got our my credit card.

the inside, lots of room
close up of the control panel
the chicken breasts, stuffed and ready to go


It arrived about 5 days later. I un-boxed it, read the directions, filled it with water and plugged it in. I took 2 chicken breasts out of the freezer and defrosted them.

The chicken breasts, cooked, browned, with mozzarella
Split the breast, stuffed them with garlic, bacon, salt, and pepper and then added a dollop of butter into the vacuum bag and sealed it.

After cooking sous vide for 2 hours (I took a nap), Wayne got home hungry as usual "becuase he forgot to eat lunch"....really?* sigh, never been a problem I've had.

So made a pot of rice, added a green salad. I then took the breasts out of the water oven....their term...not mine. I like my meat seared so I heated my cast iron skillet hot with vegetable oil and browned them. After turning to the second side it added a slice of my own mozzarella and watched it melt. Split some small tomatoes, added them to the pan then plated everything.

Wayne usually does NOT finish his dinner. He saves what's left for lunch tomorrow. He ate the whole breast! Guess he WAS pretty hungry.

The first sous vide meal was a roaring success. Get ready for MORE sous vide postings.

Tuesday, December 18, 2012

Pulled Pork......pre-delicious

A wise Hawaiian cook has said that "the Pig is the only animal that comes pre-delicious"
What's THAT mean?
What it means is that pork needs NOTHING to make it perfect. It has everything it needs to taste wonderful. Anything we add.....is just additive. Either through the cooking method or spices, it's just additive.
Given that....I bought a 2# pork shoulder butt roast, rubbed it with red Hawaiian salt and liquid smoke. Then wrapped it in banana leaves and put it in the crock pot before we left for work. BANANA????? Yes, apparently it gives the meat a "grassy taste" reminiscent of luau pork baked in a ground oven. Picked up frozen banana leaves at an Asian market. (Wow....banana leaves are BIG!)
How did it turn out?
OMG......the whole house smelled delicious! Pulled out the pork and unwrapped it. Sooo nice! Tender, flavorful, and not much fat left on the meat. I "pulled" the pork apart with two forks and poured off the juices letting the fat to separate. Poured this off and then added the leftover juices to the meat. Final weight of meat....1.3#. About 60% left over.

Added sides were rice, green salad (with pickled onions), and a finely cut coleslaw with vinegar/soy/sesame oil dressing. I also made a sauted onion smokey BBQ sauce. Ahhhhh.
We barely put a dent in this meat for the first meal. Leftovers for the next day.

Stir fry with Vegies for day 3, home made pasta and the pork for day 4, and finally.....BBQ pork pizza to polish it off. Wayne took leftovers to work every day. We got a lot of mileage from 2# of pork! The original roast cost $6 or so.
I forgot to take pictures until the last day with the pizza. DOH!